Surface Requirements for Applying Vinyl
Instructions for Graphics Application
Vinyl Graphics Application
Information
Vinyl Graphics
Material
We use only high quality materials to give you years of lasting color. The manufacturer rates the vinyl film we use at
six years.
Storage
Graphics must be kept clean, dry, and stored flat. If graphics will be
stored more than one year we suggest that they be placed in an airtight
bag or container.
Vinyl
Colors
Computer screen colors (web colors) will not exactly match the actual colors of
the vinyl. Actual vinyl colors are more vibrant than what you see on the
computer screen. Other vinyl types and colors are available by
request (but with additional lead time and cost) such as gold or silver, gradients and so on. E-mail
us with any requests you may have.
Troubles
With Bubbles
You may have some small bubbles in your graphic after
application. Small
bubbles will go away over time (the film breathes and will flatten out
after a few weeks depending on temperature). To manually remove bubbles, prick them with a pin, then
press the film down with your
thumb. Larger bubbles may need to be removed manually.
Warranty
FreedomNet guarantees delivery of a good quality product without defect or we will
replace it with an identical order item or refund your money if you wish. Contact us within 48 hours of
delivery for any issues. Buyer pays return shipping of unused
item. Claims for shipping damage must
be filed with the shipper immediately. Buyer must take optional shipping
insurance to be covered for shipping damage. Any adhesion problems are assumed
to be the result of improper conditions or installer errors. Weather,
chemicals, prolonged sunlight, abrasion, etc, can greatly reduce material life.
No refunds on "cut to order" custom items.
Graphic
Removal
The difficulty of removing graphics will vary depending on the quality and
condition of the film to be removed, how long it's been on, if it's
weathered, and so on. Gradually move along the graphic with a hair dryer
(not a heat gun),
while picking the graphic off as you go.
Do not pull UP on the vinyl (it may lift paint). Pull BACK carefully at
180 degrees. Another method (but NOT
recommended for INDOOR VINYL) is to spray the graphic with window cleaner
and use a razorblade to scrape the graphic from the surface. The window
cleaner helps remove vinyl and adhesive and helps prevent damage to the
surface from the razorblade.
Surface Requirements for Applying Vinyl
Surface Preparation
All surfaces must be thoroughly cleaned before the application of vinyl
graphics. Follow the instructions below for specific cleaning procedures:
Interior Painted Surfaces
Clean with any household cleaner such as Formula 409 or Fantastic. Wipe area clean and dry with a lint free cloth before applying vinyl graphics. Freshly painted surfaces should dry for at least 72 hours before applying vinyl graphics.Plastics & Glass
Thoroughly wipe the application surface clean with rubbing alcohol. Remove any material such as tape or glue with a razor blade.Painted Metals and Base Metals
These surfaces may be cleaned with rubbing alcohol, xylol, naphtha, or lacquer thinner (test an inconspicuous painted area with the solvent you use to insure compatibility with the paint). Dry the surface with a lint free cloth before the solvent evaporates. Freshly painted surfaces should dry for at least 72 hours before applying vinyl graphics.
Temperature & Weather
Conditions
For
best results the room temperature and temperature
of the target surface should be between 45 and 90 degrees F. Do not apply on misty or rainy days. Very high humidity may effect the
application process. Avoid installing graphics in
direct sunlight due to rapid surface temperature changes. Do the
application in a wind-free area. Wind gusts will cause problems especially
after the liner is removed and the vinyl adhesive is exposed!
| Instructions
for Graphics Application READ ALL INSTRUCTIONS before application. For information on larger graphics or vehicle side graphics see paragraph after Step 5 below. If you have no experience with vinyl graphics and feel unsure about applying them, you may want to seek help from a local professional shop. |
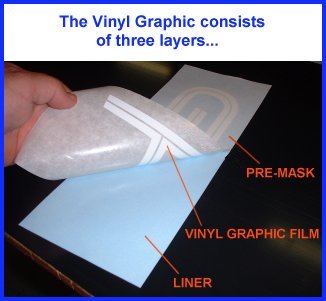 |
|
Tools & Materials Needed: 1. X-acto
knife or razor blade. (to separate segments of the graphic if necessary). |
| Step
1:
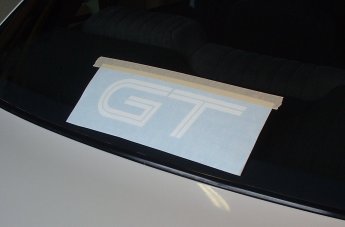
First, lay the graphic face down on a flat surface. Using a squeegee, credit card, or similar item, firmly rub graphic area starting from the center and moving outward. This will insure that the graphic is adhered to the pre-mask. For small & medium graphics, apply a single horizontal strip of 1"- 2" masking tape to the top of the graphic. The centerline of the tape strip should lie on the edge of the graphic (half the width on each side as shown). The strip will serve as a hinge to insure that the graphic does not move during the application process. |
 |
| Step
2:
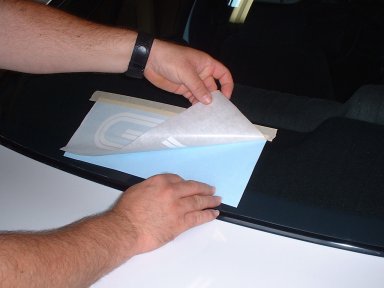
Hold the bottom edge of the hinged graphic away from the target mounting surface and remove the liner to expose the sticky face of the vinyl. CAUTION
! Do
not let the exposed graphic TOUCH the target surface. The graphic
face is very tacky and will tightly stick to the
surface. If the placement is not correct, removing the graphic for
repositioning will be very difficult (and maybe impossible) without causing
damage to the vinyl. |
 |
|
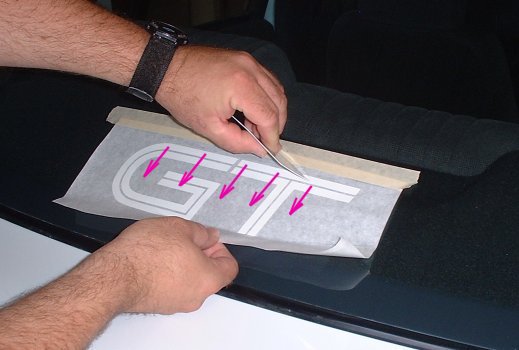
Step 3: Continue holding the hinged graphic away from the target surface. Using the squeegee, begin the graphic application at the top edge and work toward the bottom. Smooth the graphic down on the target surface with a sweeping motion. AGAIN
- Work
from the top to the bottom. Do not let the entire graphic drop onto the
target surface. If creases or wrinkles develop, carefully lift and
reposition
the graphic. |
 |
| Step
4:
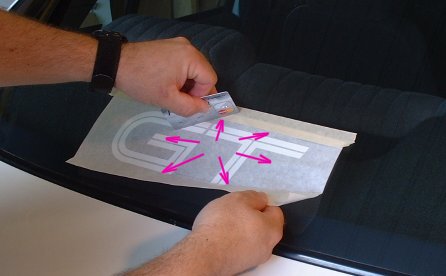
When the graphic is in
the correct position and lying perfectly
flat, firmly press the graphic down with the squeegee (starting at
the center and sweeping outward) to insure that all elements
of the graphic adhere to the target surface. |
 |
|
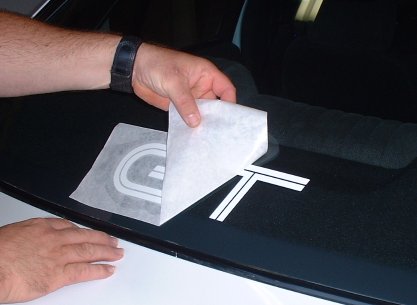
Step 5: Gently
remove the pre-mask. Pull back at a sharp angle to help avoid lifting the
graphic along with
the pre-mask. |
 |
|
For larger or longer graphics
the "WET" method may be necessary
(But not
recommended for INDOOR VINYL). The wet method is more forgiving
when repositioning is necessary. Using a spray bottle (filled
with a mix of 1 quart water and 2 drops of dish soap) lightly
spray area under graphic JUST before application with squeegee. For
long window banners; AFTER applying the tape
"hinge" split entire graphic in half or into thirds between
letters and apply one section at a time working downward from
hinge. For long "visor" type banners;
position banner and secure with masking tape on bottom edge, trim top of
graphic to fit
glass. Secure top edge with tape at only one end (from
center outward) remove the liner (and any bottom edge tape) at other
half and apply the
graphic with a squeegee from the center outward (rather than top
down as with hinge method). Now remove all tape and liner on other half
and apply in same manner, from center outward. Trim ends of visor
graphic to fit glass. Vehicle Side Graphics may require cutting around side trim, door handles, shadow lines etc. Cut vinyl back about 1/8" to 1/4" from these features with X-acto knife or razor blade (be careful not to cut into paint). |
Large graphics are best applied with help from another person to hold vinyl (at the corners of the pre-mask) up off from glass ahead of the squeegee |
| Step
6:
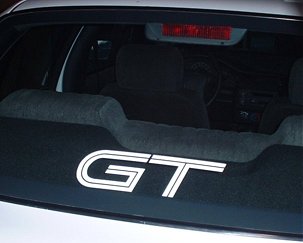
ENJOY !
|
|